BMW X5 and X6 Forum 2014-Current
BMW Garage BMW Meets Register Today's Posts

Go Back   BMW X5 and X6 Forum (F15/F16) > BMW X5 (F15) and BMW X6 (F16) Forum > BMW X5 and X6 (F15/F16) Forum

Post Reply
 
Thread Tools Search this Thread
      01-05-2014, 02:07 PM   #23
avi8tir
Captain
avi8tir's Avatar
396
Rep
855
Posts

Drives: ///M
Join Date: Oct 2011
Location: SNA IAH AMS

iTrader: (0)

Already have it all buttoned up so hopefully this will help a bit....

First, remove the weather stripping.... pops right off and right back on when done.
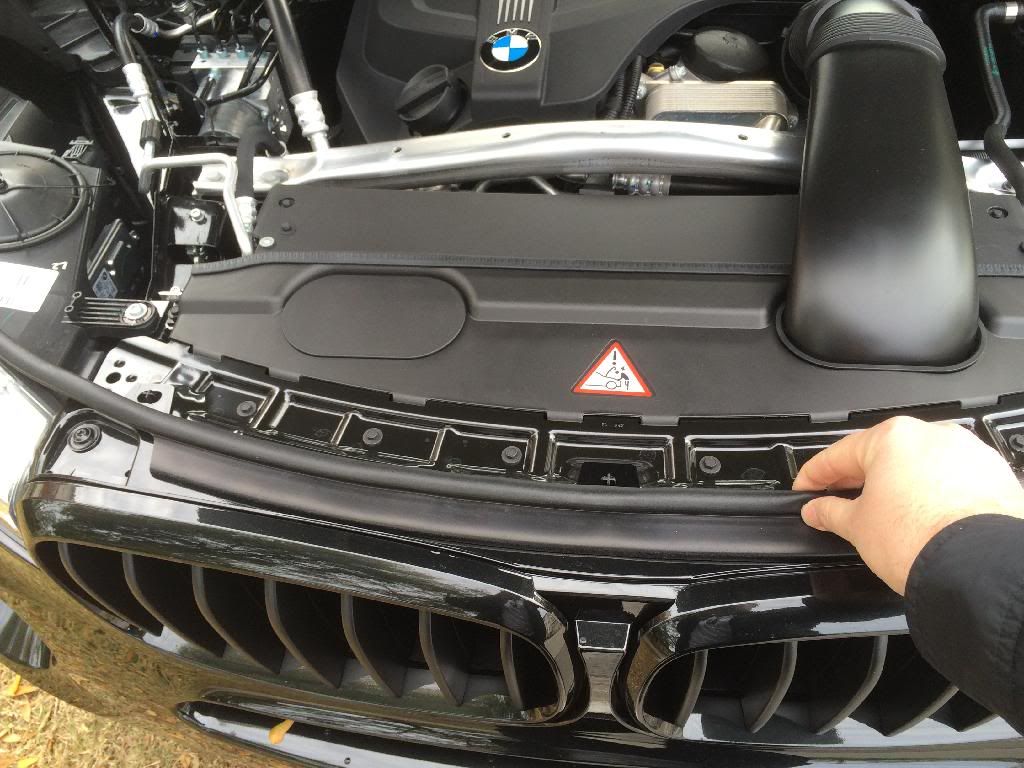

Next remove these 5 torx screws - this will allow you to pull the top of the bumper forward enough to access the top clips with a flathead screwdriver. do the top 2 first... this will release the top a bit.... then do the sides.... make sure to keep it pulled out or it will pop back in. Once the top and sides are done, you can reach behind and underneath to release the bottom 2 clips with your fingers.
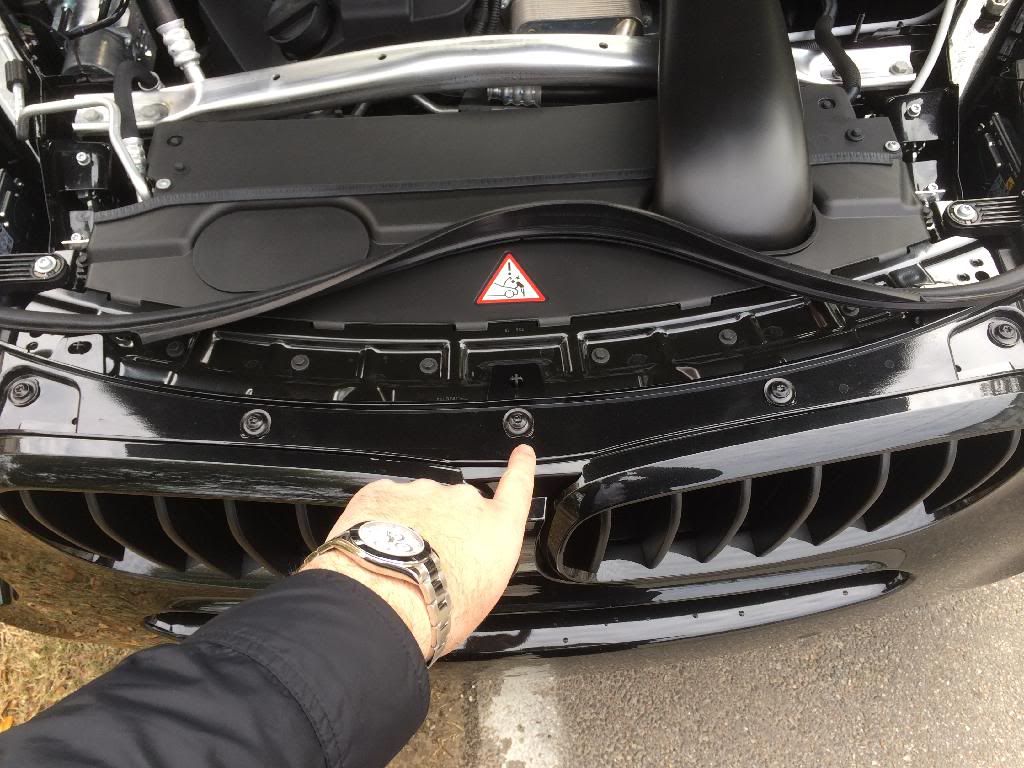

Here are the clips... you need to push on the center part which will allow it to release
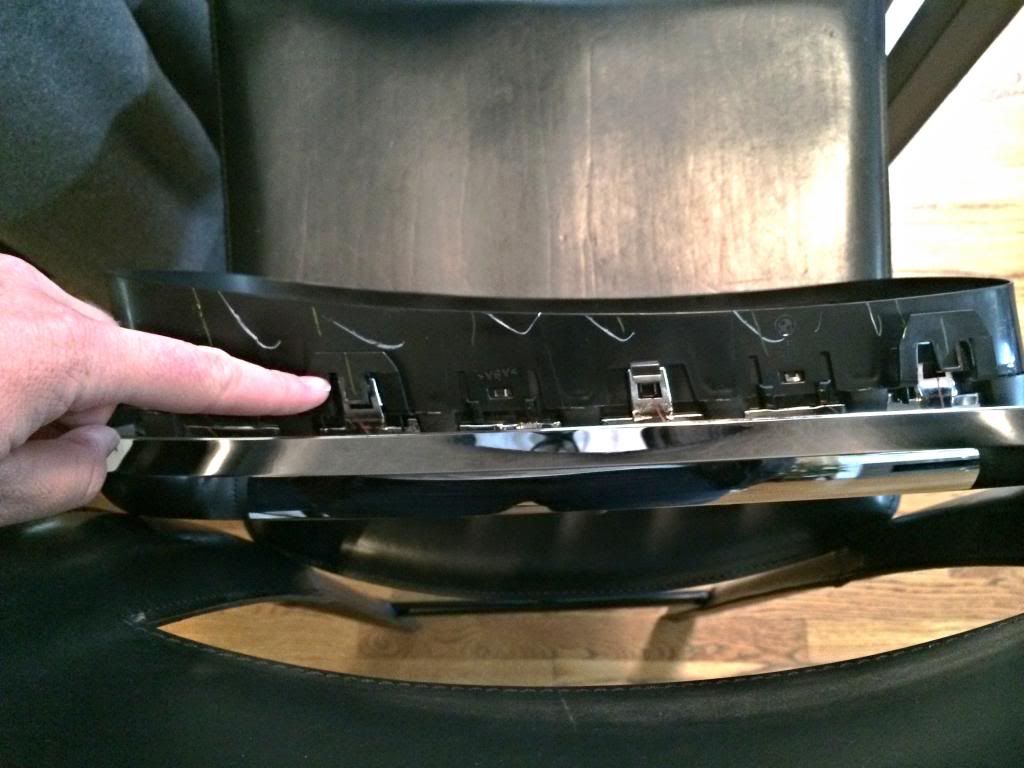


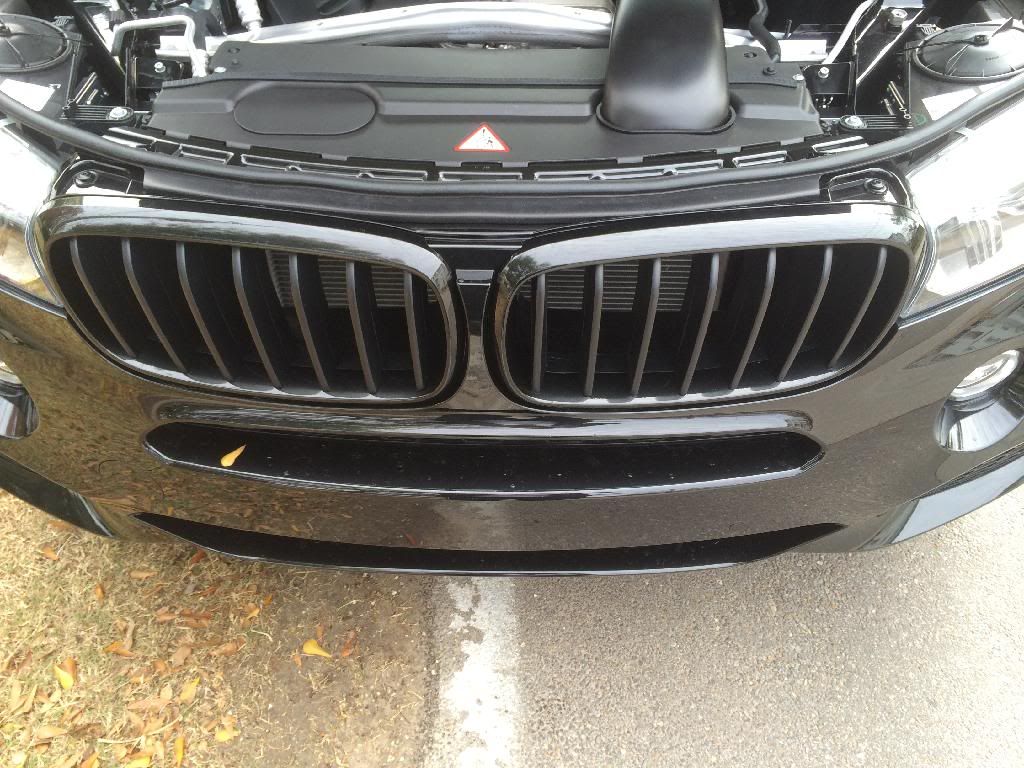
The replacements pop right in. put the torx screws back and pop the weather stripping back on.
Appreciate 0
      01-05-2014, 02:45 PM   #24
Baboum68
Private
France
8
Rep
61
Posts

Drives: X5 G05
Join Date: Dec 2013
Location: France

iTrader: (0)

Thanks a lot! looks quite easy. how easy is it to pull the bumper and put it back properly?
Appreciate 0
      01-05-2014, 03:14 PM   #25
avi8tir
Captain
avi8tir's Avatar
396
Rep
855
Posts

Drives: ///M
Join Date: Oct 2011
Location: SNA IAH AMS

iTrader: (0)

Quote:
Originally Posted by Baboum68 View Post
Thanks a lot! looks quite easy. how easy is it to pull the bumper and put it back properly?
Easy. The plastic bumper is fairly flexible so don't hesitate to give it a good tug to gain access to the back of the grilles. There are posts that it fits over in 3 spots so it's simple to get it back into place.
Appreciate 0
      01-05-2014, 06:16 PM   #26
LSM
Lieutenant Colonel
LSM's Avatar
No_Country
1118
Rep
1,809
Posts

Drives: 2024 Porsche 911 GTS Cab
Join Date: Aug 2011
Location: United States

iTrader: (0)

Seems easy enough but I saw the service manager do it, the bumper didnt line up took forever to make right...
__________________
2024 Porsche 911 GTS Cabriolet
Appreciate 0
      01-05-2014, 08:11 PM   #27
deadbuck
Private
9
Rep
61
Posts

Drives: BMW X5 F15 M Sport
Join Date: Jan 2014
Location: Jacksonville

iTrader: (0)

You can look it up through google and find a how to video that shows you step by step. I did mine 3 weeks ago and forgot or I would tell you. I know you need to unscrew the top of the bumper to access the clips. Good Luck!
Attached Images
 
Appreciate 0
      01-06-2014, 12:06 AM   #28
Baboum68
Private
France
8
Rep
61
Posts

Drives: X5 G05
Join Date: Dec 2013
Location: France

iTrader: (0)

What kidneys are these? Looks like a mix of titanium and m performance?
Appreciate 0
      01-06-2014, 04:55 PM   #29
LSM
Lieutenant Colonel
LSM's Avatar
No_Country
1118
Rep
1,809
Posts

Drives: 2024 Porsche 911 GTS Cab
Join Date: Aug 2011
Location: United States

iTrader: (0)

Quote:
Originally Posted by Baboum68 View Post
What kidneys are these? Looks like a mix of titanium and m performance?
He painted the outside of the standard grill black and left the inside untouched..Its stock M sport grill otherwise
__________________
2024 Porsche 911 GTS Cabriolet
Appreciate 0
      03-06-2014, 04:31 PM   #30
bluelodge400
Private First Class
bluelodge400's Avatar
31
Rep
111
Posts

Drives: '21 X5M-C, '19 Cayenne Turbo
Join Date: Nov 2013
Location: Hillsborough, CA

iTrader: (0)

Avi8tir,
Thank you for this write up.
Also, NICE Daytona!!!


Quote:
Originally Posted by avi8tir View Post
Already have it all buttoned up so hopefully this will help a bit....

First, remove the weather stripping.... pops right off and right back on when done.

Next remove these 5 torx screws - this will allow you to pull the top of the bumper forward enough to access the top clips with a flathead screwdriver. do the top 2 first... this will release the top a bit.... then do the sides.... make sure to keep it pulled out or it will pop back in. Once the top and sides are done, you can reach behind and underneath to release the bottom 2 clips with your fingers.

Here are the clips... you need to push on the center part which will allow it to release

The replacements pop right in. put the torx screws back and pop the weather stripping back on.
Appreciate 0
      04-08-2014, 08:15 PM   #31
ljxrayman
Private
14
Rep
67
Posts

Drives: 2014 X5 M Sport Mineral White
Join Date: Feb 2014
Location: Richmond, BC

iTrader: (0)

Quote:
Originally Posted by avi8tir
Already have it all buttoned up so hopefully this will help a bit....

First, remove the weather stripping.... pops right off and right back on when done.


Next remove these 5 torx screws - this will allow you to pull the top of the bumper forward enough to access the top clips with a flathead screwdriver. do the top 2 first... this will release the top a bit.... then do the sides.... make sure to keep it pulled out or it will pop back in. Once the top and sides are done, you can reach behind and underneath to release the bottom 2 clips with your fingers.


Here are the clips... you need to push on the center part which will allow it to release


The replacements pop right in. put the torx screws back and pop the weather stripping back on.
Bullshit!!!
Beware DIY F15 owners, there are actuall 3 CLIPS at the bottom on each side!! I almost broke the clip because I "assume" there were only 2 clips after this reply.
Attached Images
 
Appreciate 0
      04-08-2014, 08:43 PM   #32
ljxrayman
Private
14
Rep
67
Posts

Drives: 2014 X5 M Sport Mineral White
Join Date: Feb 2014
Location: Richmond, BC

iTrader: (0)

There are 7 clips on each side of the kidney grille, 2 top, 2 side, 3 bottom.

Tools you will need:
1. Long skinny flat head screw driver
2. Size 30 - Torx Screw Driver

Step 1: Pop the hood

Step 2: Peel off the Rubber Strip to uncover the 5 Torx Screws

Step 3: Unscrew the 5 Torx screws

Step 4: Lift up the 3 white bumper holders and pull the bumper outward about 1 inch

Step 5: Take off the round-rectangular black air intake cover on the left side to access the back of the kidney grilles.

Note: It is MUCH EASIER to start with the left side grille.

Step 6: Use the flat head screw driver to stick out the two clips at the top of the grille, make sure you use one hand to hold the screw driver while the other hand holding the chrome part and trying to pull it outward.

Note: Make use of the rectangular hole at the middle of the two grilles to get access to the 2 inner side clips.

Step 7: Stick the flat head screw driver into the "rectangular" hole to stick out the inner side clip,

Caution: Use another hand to pull out the grille while you doing this step, otherwise the grille might pop back in.

Step 8: Unclip the outer side clip using the screw driver.

Step 9: (HARD) Use you finger to feel the bottom 3 clips and pop them out, use another hand to pull the grill out at the same time.

Step 10: Do the same steps for the other side.
Attached Images
     
Appreciate 0
      06-26-2017, 11:55 PM   #33
E30toF30
Captain
Canada
121
Rep
749
Posts

Drives: 2016 528i Executive Edition
Join Date: Mar 2015
Location: Vancouver

iTrader: (1)

Garage List
Quote:
Originally Posted by avi8tir View Post
Already have it all buttoned up so hopefully this will help a bit....

First, remove the weather stripping.... pops right off and right back on when done.


Next remove these 5 torx screws - this will allow you to pull the top of the bumper forward enough to access the top clips with a flathead screwdriver. do the top 2 first... this will release the top a bit.... then do the sides.... make sure to keep it pulled out or it will pop back in. Once the top and sides are done, you can reach behind and underneath to release the bottom 2 clips with your fingers.


Here are the clips... you need to push on the center part which will allow it to release


The replacements pop right in. put the torx screws back and pop the weather stripping back on.
Just wanted to say thanks for these tips. This along with ljx*****n's reminder of 3 clips under earth made this a super easy diy. I'm unsure why others spent hours trying to do this only to give up and pay a dealer to do it. I was worried about this DIY but it ended up going pretty smoothly. My "after" picture of the car below was taken 16 minutes after I took a before picture prior to starting.

For the record, I ended using some pry tools that I use for prying interior trim pieces to press the tab down on the top clips. And then just pulled on the bumper skin and stuck my hand in to press the side and bottom clips.

Painted reflectors from RGSport are in the mail and going on next! Thats a DIY i'm really worried about! Sound's like its going to be much harder than the painted reflector DIY on my F30 and F10
Attached Images
 

Last edited by E30toF30; 06-27-2017 at 12:02 AM..
Appreciate 0
      07-09-2017, 04:53 PM   #34
Kr0m3assass1n
kr0m3assass1n
Kr0m3assass1n's Avatar
United_States
1094
Rep
861
Posts

Drives: 22 X7 M50i
Join Date: Jul 2017
Location: Virginia

iTrader: (0)

Garage List
Quote:
Originally Posted by E30toF30 View Post
Just wanted to say thanks for these tips. This along with ljx*****n's reminder of 3 clips under earth made this a super easy diy. I'm unsure why others spent hours trying to do this only to give up and pay a dealer to do it. I was worried about this DIY but it ended up going pretty smoothly. My "after" picture of the car below was taken 16 minutes after I took a before picture prior to starting.

For the record, I ended using some pry tools that I use for prying interior trim pieces to press the tab down on the top clips. And then just pulled on the bumper skin and stuck my hand in to press the side and bottom clips.

Painted reflectors from RGSport are in the mail and going on next! Thats a DIY i'm really worried about! Sound's like its going to be much harder than the painted reflector DIY on my F30 and F10


HUGE thank you all to the posters on this thread. I'm an F15 newbie but I have to say that the collective knowledge and support from this incredible forum has encouraged me to do several updates to both my (F10/ F15) cars that I ordinarily would never attempt. I had been debating back and forth to get the grill swap done on by x35i at the dealership and I even looked on Y**Tube to no avail but with the pics from ljx*****n and all the other helpful tips I decided to take this on myself today.

I did have the biggest problem determining where to position the flathead screwdriver to unseat each clip but once I did, it took all of 15 mins to do both sides.
This is the order of clips I attempted (L for left side while facing the car, R for right):
1. L Top edge # 1 & 2
2. L Left edge #1 (This also allowed me to pry the chrome out far enough to access the other remaining clips below)
3. L Right edge #1 (using the rectangular hole at the top in the middle of both grills)
4. Once the top, left and right sides were done, I was able to gently wiggle and pry out the bottom clips out, i.e. didn't have to unseat any of the bottom clips and there was zero damage to the bumper or my old grill).
5. Repeat Steps 1, 2 and 3 and 4 for the R side.

The biggest helpful hint was to keep one hand on the chrome part of the grill and keep it pulled gently outward so that as soon as each clip is unseated, you immediately know you're good to go to the next one because they do tend to seat back if you're not paying attention.


Lastly, I am happy to assist anyone else in undertaking this by themselves! If anyone requires assistance in the DC/MD/VA area for their f15/f10, PM me and I am more than happy to meet to help you.

Cheers!
Appreciate 0
      07-09-2017, 05:36 PM   #35
beachcomberx5
Private First Class
68
Rep
124
Posts

Drives: X-5
Join Date: Jul 2017
Location: NJ

iTrader: (0)

I paid the stealership $100.?

Money and time well spent since I bought the grills on sale and used eBay bucks.
Appreciate 0
      07-27-2017, 06:46 AM   #36
neverdone
Major
Canada
327
Rep
1,397
Posts

Drives: X5, 335, Ford Lightning, 63 me
Join Date: Jun 2014
Location: calgary

iTrader: (0)

Quote:
Originally Posted by Kr0m3assass1n View Post
HUGE thank you all to the posters on this thread. I'm an F15 newbie but I have to say that the collective knowledge and support from this incredible forum has encouraged me to do several updates to both my (F10/ F15) cars that I ordinarily would never attempt. I had been debating back and forth to get the grill swap done on by x35i at the dealership and I even looked on Y**Tube to no avail but with the pics from ljx*****n and all the other helpful tips I decided to take this on myself today.

I did have the biggest problem determining where to position the flathead screwdriver to unseat each clip but once I did, it took all of 15 mins to do both sides.
This is the order of clips I attempted (L for left side while facing the car, R for right):
1. L Top edge # 1 & 2
2. L Left edge #1 (This also allowed me to pry the chrome out far enough to access the other remaining clips below)
3. L Right edge #1 (using the rectangular hole at the top in the middle of both grills)
4. Once the top, left and right sides were done, I was able to gently wiggle and pry out the bottom clips out, i.e. didn't have to unseat any of the bottom clips and there was zero damage to the bumper or my old grill).
5. Repeat Steps 1, 2 and 3 and 4 for the R side.

The biggest helpful hint was to keep one hand on the chrome part of the grill and keep it pulled gently outward so that as soon as each clip is unseated, you immediately know you're good to go to the next one because they do tend to seat back if you're not paying attention.


Lastly, I am happy to assist anyone else in undertaking this by themselves! If anyone requires assistance in the DC/MD/VA area for their f15/f10, PM me and I am more than happy to meet to help you.

Cheers!
can confirm the easiest way is to pull 7 screws. 5 torx and 2 socket screws. flat head for the top 2 and 2 sides and then reach your arm down and feel the bottom 3.

once you feel the bottom 3 they easily push out, but it did take a little while to mess around with it for the first one....

MAKE SURE YOU TAKE BOTH OUT BEFORE PUTTING ONE BACK IN!


edit: I still don't know how the fuck to post pics lol of someone could fix those and tell me what I did wrong, that would be great.
Appreciate 0
Post Reply

Bookmarks


Posting Rules
You may not post new threads
You may not post replies
You may not post attachments
You may not edit your posts

BB code is On
Smilies are On
[IMG] code is On
HTML code is Off


All times are GMT -5. The time now is 10:24 PM.


xbimmers
Powered by vBulletin® Version 3.8.11
Copyright ©2000 - 2024, vBulletin Solutions Inc.
1Addicts.com, BIMMERPOST.com, E90Post.com, F30Post.com, M3Post.com, ZPost.com, 5Post.com, 6Post.com, 7Post.com, XBimmers.com logo and trademark are properties of BIMMERPOST